Introduction
Control and Performance Method what we’re going to talk about is how we teach people the basics of instrument flying, the instrument foundation, and if we have two books that they put out for us to teach with. One is the Instrument Procedures Handbook, the other is the Instrument Flying Handbook. So let’s start, though, by remembering the FAA still always will want us to teach private pilots how to fly instruments, student pilots how to fly instruments. You know, before we can send somebody on a long , before we can send somebody on a solo cross-country, we have to teach them instruments.
That’s in 61.93E, item 12. We’ve got to teach them reference to instruments, how to fly reference to instruments. Before we can send them to a private pilot check ride, we have to give them at least three hours of instrument training, and if we choose to, we can send them with 37 and a half hours of airplane time and an additional two and a half hours of instrument flying time.
So we can give them, and that instrument flying time is on an AAT simulator. So we can give them three hours in the airplane, followed up by another two and a half hours in a simulator, or teach right alongside it.
This foundational training sets the stage for introducing structured methods like the control and performance method, which is widely considered an effective way to build strong instrument flying habits.
By beginning with this method early on, student pilots gain confidence in interpreting and responding to instrument indications. The control and performance method remains a cornerstone in FAA-guided instruction and is a reliable approach throughout a pilot’s training journey.
Table of Contents
1. Methods of Teaching Instrument Flying
Control and Performance Method we look at how to teach people instruments, the best thing to do is go to the Instrument Flying Handbook, Chapter 6, Section One: Attitude Instrument Flying. And when we go to Chapter Six, Section One on attitude instrument flying, we’re going to see that there are two methods, two learning methods that the FAA talks about how we teach instruments. The two basic methods used, as they tell us, are the control and performance method and the primary and supporting method. Most people find that the control and performance method is much simpler.
That’s what the United States military tends to use, how they teach their instrument students, whereas primary and supporting is the method that was taught by the FAA for years. There wasn’t any discussion about the control performance concept in the Instrument Flying Handbook for a long time. Then it made it into the back of the handbook, and then eventually it made its way to the front of the handbook.
2. Understanding Control and Performance
If we read this right here, it tells us the two basic methods used for learning the attitude instrument flying are the control and performance method, and primary and supporting. It says both methods utilize the same instruments and response for attitude control.
They differ in reliance on the attitude indicator and interpretation of other instruments. So when we teach the control and performance process, there’s a four-step process we use. The FAA has it in their manual, and it tells us that we establish, trim, and then cross-check and adjust.
3. The ETKA Process Explained

let’s go through that a little bit more. I’m going to go to a drawing I’ve done. This is how I typically teach it. So, the control and performance concept, we also use a mnemonic memory aid called ETKA. Some people use this. So in ETKA, it stands for the E. The E in ETKA right here, well, that stands for Establish.
Here we want to establish known pitch, bank, or you could say attitude and power settings on the control instruments for each phase of flight. So we want to establish known pitch, bank, and power settings on the control and performance method instruments for each phase of flight.
4. Trimming and Cross-Checking
Now there are several phases of flight, and we’re going to take a look at that in a minute. The second step to the ETKA process, the T, is Trim—trim off pressure. And then the third portion is to cross-check the performance instruments. We want to cross-check the performance instruments, and then the fourth step is to go back and adjust the control and performance method.
5. Cross-Check Flow and Instrument Emphasis
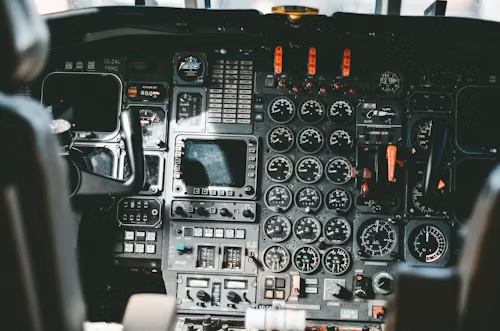
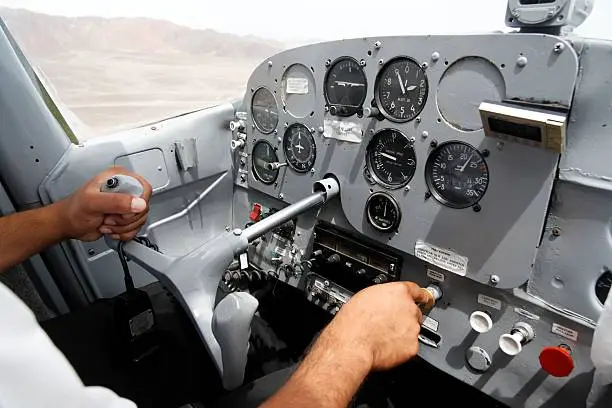
So let’s take a look at what this means to us. We’re going to try to draw on what we have here. So we have a basic six-pack of instruments, with this left one being right here being the airspeed indicator. Then, of course, we’ve got our attitude indicator.
Come over here, we’ve got an altimeter, and then we’ll come down here for our turn coordinator, some sort of heading indicator, or maybe our HSI. And then from there we’ve still got our vertical speed indicator, or VSI—if it’s an instantaneous one. And then we’ve also got, in many airplanes, manifold pressure as one of our power indicators, and we’ve also got RPM.
6. Instrument Prioritization
So, using the control and performance method, about 80% of our time is spent on the attitude indicator, which, if you do the math, leaves you somewhere around 4% on each of the other indicators. Well, I don’t know that you’re going to split it exactly like that. It’s an 80/20 rule, with 80% on the attitude indicator and 20% on everything else.
So here on the attitude indicator, we’re going to establish a known pitch and bank. And on the power settings, we’re going to establish known manifold pressure and/or known RPM. So there’s your pitch, bank, and power, or we could just say your attitude and power settings on the control instruments. And then we’re going to trim off pressure, and then what we’re of course going to do is start in our cross-check.
7. Cross-Check Technique
And the way we tend to do that, starting at the attitude indicator, we tend to go one way or the other. It doesn’t matter much. Maybe we go to the attitude indicator—or the altimeter, excuse me—and then maybe back to the airspeed. But notice we’re always going to the attitude indicator in between each one.
So maybe our cross-check is something like this, where we always make our way back to the attitude indicator. That’s what we tend to think of as a hub and spoke, with the attitude indicator being 80% of it, the other instruments being 20 or so percent. That’s the performance instruments.
Performance instruments, of course, are blue. Control and performance method instruments are red. And maybe we’re going to come over and check our manifold pressure here, always going back to the attitude indicator, and back to the RPM, and back to the indicator. So that’s the basic flow of the cross-check.
8. Instrument Flying Phases
We’re going to establish, trim, and cross-check the performance instruments, and then we’re going to turn around and adjust the control and performance method instruments. So now, when we do this, we talk about establishing known pitch, bank, and power settings for each phase of flying.
Well, there’s not necessarily a specific number of phases in terms of what’s right or wrong. People tend to see it a little bit differently, I think. But if we look at what seems to be a common way of thinking with most people, we have a phase where we take off, and then we’re doing a departure and a climb out. From there somewhere we’re going to level off—cruise—we could list that as a separate, of course, phase of flight.
Then we’re going to descend, and then we might go into approach level coming in from the initial approach fix, and then maybe a precision approach or non-precision approach. I’ve seen people list down six, seven phases; I’ve seen people list down eight, nine. So whatever tends to work for you.
9. Common Cross-Check Errors
But the control and performance method starts with establishing known pitch, bank, and power settings on the control instruments for each phase of flight, then we trim off that pressure, and then we’re going to cross-check our performance instruments. So, how do we cross-check?
Well, we just went through that. We talked about right here that we start the attitude indicator, and maybe we go this way, we go like this, and we’re also going to make our way over, of course, to the engine instruments. But what we want to talk about here is some cross-check errors. One error may be fixation, that you just really fixate on one instrument or the wrong instrument. Maybe you look at your attitude indicator the whole time, and you don’t cross-check—that’d be fixation.
And if you’re going to fixate, you’re probably going to omit something. And then the third type of error would be emphasis. So if we’re going to place too much or too little emphasis on something, maybe rather than looking at the attitude indicator 80%, you’re looking at everything more like 20% equal—that would be an emphasis issue. Another thing would be if we’re not checking our backup instruments—that would also be emphasized.
10. Understanding Pitch and Bank Instruments
So it has two, from which one is control and performance method. It tends to be the cornerstone or foundation of how we do instrument flying. But another thing we want to show you as well is what our pitch instruments are and what our bank instruments are. So the pitch instruments tend to be these instruments right here.
These are pitch instruments—our airspeed tells us if we’re pitching up or not, so is our attitude indicator, and so is our altimeter, of course. And then another one that’s going to tell us that just as quickly, would be our vertical speed indicator. Now, another grouping of instruments we can also talk about would be our bank instruments.
Our attitude indicator tells us if we’re banking, and so is our heading indicator, or HSI—it tells us the same thing. And then also so does our turn coordinator. So we tend to end up with a couple of L patterns here. We’ve got the, again, we’ve got our pitch instruments that are all right here, and we also have our bank instruments.
11. Conclusion
So, in closing, the control and performance method is a very good foundational tool to teach your student pilot, your private pilot, and your instrument pilot how we fly instruments. It’s one of two methods.
In my opinion, it’s the easiest method. And all we have to do is go back and remind ourselves what our control instruments are—these are the red ones—what our blue instruments are—or what our performance instruments are—these are the blue ones—and then from there we can just move through the process, kind of an 80/20. And this is, in my opinion, probably the most important foundation for instrument flying is to have a good cross-check.
And if you teach your student pilot that, he or she’s going to have the basics and the law of primacy, that when they go on to get their instrument or commercial, they’ve got a really good foundation on how to fly instruments.
1. What is the control and performance method in instrument flying?
The control and performance method is a foundational instrument flying technique that involves establishing a specific aircraft attitude and power setting , trimming the aircraft, then cross-checking performance instruments to verify desired results. It’s widely used in military and civilian training for its clarity and effectiveness.
2. What does ETKA stand for in the control and performance method?
ETKA is a mnemonic for the four-step process: Establish attitude and power, Trim, Kross-check , and Adjust as needed. This systematic approach helps pilots maintain precise aircraft control during all phases of flight under instrument conditions.
3. How does the control and performance method differ from the primary and supporting method?
Both methods use the same instruments, but the control and performance method focuses on setting known attitudes and power first, then verifying performance. The primary and supporting method emphasizes interpreting instrument roles for each maneuver.